
In this lesson you will learn how to use the Fruity Compressor in FL Studio very easily. When you understand how this compressor works, you can use the same principles and apply it with any other compressor plugins. We will be using the Fruity Compressor because it’s very basic and easy to understand.
What does a compressor do?
People often make a big deal out of compression, but it’s actually really simple. Especially when you understand what it comes down to. So, what does a compressor do?
The only thing you need to remember is: a compressor controls the volume dynamics of your sound or mix. But what does that mean?
You can set a compressor to tell it WHEN and HOW it should change the volume of a signal. That’s basically all it does. So, you determine when the compressor should be active and how the compressor should deal with the volume of a sound.
What do the knobs on a compressor mean?
To change the volume of a sound, there are a few buttons we can use. The Fruity Compressors has 6 knobs that we can control and set how we want it to act. Let’s take a look at all the knobs.
THRESHOLD
Determines the volume at which the compressor kicks in. If a certain amount of volume (dB) is reached, the compressor will start.
RATIO
Determines the amount of compression. A low ratio results in “weak” compression and a high ratio results in “aggressive” compression.
GAIN
Determines the volume of the compressed output signal. You can normalize or limit the output sound by changing the Gain.
ATTACK
Determines the time (in milliseconds) it takes to reach full compression. It basically sets the moment the compressor should start working.
RELEASE
Determines the time (in milliseconds) it takes for the compressor to stop acting. It basically sets the moment the compressor should stop working.
TYPE
Determines the “type” of compression. It controls the rate at which compression is applied. SOFT means gradual increase of compression. HARD means immediate increase of compression. VINTAGE and MEDIUM are in between those 2 extremes.
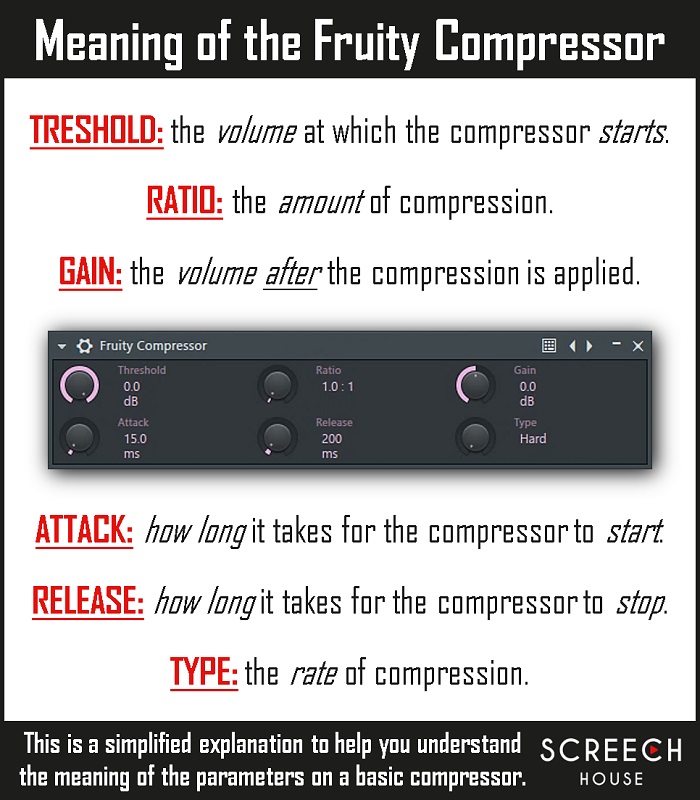
To summarize…
- TRESHOLD: The volume at which the compressor starts.
- RATIO: The amount of compression.
- GAIN: The volume after the compression is applied.
- ATTACK: How long it takes for the compressor to start.
- RELEASE: How long it takes for the compressor to stop.
- TYPE: The rate of compression.
How to use a compressor
Extreme settings often give a better idea how the parameters work. You get a better feel for things if you apply aggressive changes and listen to the result. That’s why I recommend to do that and play around when you’re learning this.
Common practices for using compression is to create snappy attacks in certain sounds or to make a sound pump more. Let’s explore both of these common practices.
Snappy attack
Making a snappy/punchy attack for a sound helps for it to punch through in a mix and to give it some transient. To achieve this, you can simply use the Fruity Compressor by adding it to the mixer track of your sound.
A short ATTACK with a relatively high THRESHOLD and RATIO will give you this effect. When you close the attack, the punch disappears. So, for the punch to exist, the attack needs to be opened a little bit.
With the GAIN knob you can enhance the volume after the signal has been compressed. You can make up for the volume that has been lost while compressing.
For the sake of it, you can always compare the uncompressed sample with the compressed sample. You can then easily hear the difference. It’s best to match the volume levels to get a good comparison.
Pumping effect
Next, we’re going to take a look at creating a pumping effect. Making a sound pump helps for it to get more drive, aggression or just as a cool effect. To do that, add the Fruity compressor to the mixer track of your sound.
Now in this case, it’s best to close the ATTACK, add some RELEASE and provide a quite aggressive THRESHOLD & RATIO. Opening up the GAIN is also pretty important to make up for the lost volume and to squeeze the signal for maximum loudness.
Just like mentioned earlier, you can always compare the uncompressed sound with the compressed sound. You can always experiment with the settings to get (slightly) different effects. Try out different TYPES or change the aggressiveness of compression.
How important is a compressor?
Now, do you really NEED a compressor? Absolutely not! Is it a useful tool in your arsenal? Absolutely! Do I often use a compressor? Actually, no I don’t. I do use limiters or distortion plugins that also control the volume of my sounds.
The biggest purpose of any volume controller is to cut off volume peaks and to make quieter parts louder. If you want more than that, a compressor can be your friend.
WARNING: compression side effects
Let me add a little warning here. Depending on your compressor settings it can cause your sound to distort a little bit. This has to do with the loudness in certain time frames and the type of compression you apply. It can clip a signal, causing some distortion. It’s just a byproduct of aggressive compression.
This is NOT a problem, unless you don’t want it to sound that way. If you don’t like the way it sounds, just change your settings to a less aggressive state.
Start compressing!
Anyways, you can now create snappy attacks, pumping sounds or anything like that. It simply depends on what you want to achieve with your compressor.
If you need more help or want to learn more, you can get a copy of my EDM Mixing Guide or FL Studio Beginner’s Guide on Amazon.
- If you’re a rank beginner in FL Studio, get the FL Studio Beginner’s Guide.
- If you’re not a rank beginner anymore, but you do want your mixes to sound awesome, get the EDM Mixing Guide.
Both books provide the essential shortcuts you need to cut off years of struggling and figure everything out on your own. They’re there for you when you need them.
Plugins
For this lesson, the following FL Studio stock plugins were used:
- 3x Osc
- Fruity Compressor

If you have a question you would like me to answer in a future video or article, you can send it (3-4 paragraphs/500 words max) to this email address: cep@screechhouse.com
If you feel my content really helps with your music productions, you can show your appreciation by doing one of the following three things:
- Make a donation to my work by clicking here to donate via PayPal every time you feel I have given you a good tip, new knowledge or helpful insight. Whether it’s a buck, $2, $5, $10, $50, or a monthly recurring donation, just pick any amount YOU think is equal to the value you received from my videos, articles, courses, etc.
- Share this website with your friends so they can start learning and improving their music making and producing skills to become successful in this area of their lives too.
- Purchase one of my products on the products page by clicking here. That way, you’ll always have access to my absolute best work. Giving you the last push you might need to get your track to that pro level.
Thank you for your support and please, keep practicing!
– Cep
Music producer & creator of Screech House